Series. Overview · 1. File · 2. Profile · 3. Projects · Choosing · 4. Matches
You have already tested with AncestryDNA, MyHeritage, 23andMe, FamilyTreeDNA or Living DNA. That is enough to start. There is no need to buy a separate test “for GEDmatch”.
GEDmatch compares raw files from different companies in one list. Ancestor Project Belarus narrows that list to people who have themselves tied their ancestors to the territory of present-day Belarus. The use appears when your kit is visible to others, signed with a surname and a place, and the application says which line it belongs to.
Below is the minimum with which you can already apply. Menus on the site are sometimes named differently. The point of the steps is the same.
Download the original file
You need raw DNA, not an ethnicity PDF and not a screenshot of the results.
- AncestryDNA. DNA → Settings → Download DNA Data. The archive contains a text file. Upload that.
- 23andMe. Settings → 23andMe Data → Download Raw Data. The file is not ready at once; the link arrives by email.
- MyHeritage. DNA → Manage DNA kits → the kit menu → Download raw DNA data.
- FamilyTreeDNA. Download Family Finder. A Y-DNA test and a mitochondrial test do not replace an autosomal kit.
- Living DNA. The raw file from the company account.
Do not open the file in Excel and do not save it again. A spreadsheet spoils the columns, and the upload then fails with no clear error.
One person, one file. If the same raw DNA already sits on MyHeritage or FTDNA, GEDmatch needs it once. A second kit of the same person looks like a twin inside the project. A father’s, mother’s or cousin’s kit is a different person, and for the project they are often more useful than yours: your DNA is half another side of the family.
Upload someone else’s file only if that person allowed GEDmatch itself, you are their guardian, or the person has died. “I already do their genealogy” does not count as permission. How GEDmatch puts it.
Sign the kit so it can be searched
Registration at gedmatch.com is free. After the upload, save the kit number. Full processing can take up to a day. No matches after ten minutes is not an error. Wait until the kit is processed: until then the administrator will not see you in comparisons.
Write the alias in Latin script, so a stranger can tell whom to look for. Cyrillic in a match list is often unread:
Khoruzhko, Pinsk, Rakow, Logoisk
DNA123, Kit1 and a bare first name are useless for a project.
Name the testing company. A match needs to know where your tree is: on Ancestry, MyHeritage or FamilyTreeDNA. Set the sex of the person who tested, not your own, if you are uploading a father or a mother. Write a haplogroup only if it is known from a test. An empty field is correct here. A guessed haplogroup is worse than an empty one.
A project needs the public modes: Public + Opt-In or Public + Opt-Out. Both are visible to genealogists. The difference is about the extra GEDmatch PRO comparisons, not about an ordinary search for relatives. Under Opt-Out the kit may still take part in a search for unidentified remains. Personal Research and Private empty the application: the project does not find you. The modes are described on the privacy page.
If you already have a tree, export a GEDCOM and hide living people before the export. Attach the kit to the card of the person who tested. In the places, write both the historical name and the modern one: village, volost, district, governorate, then the modern district and region. Ivan Ivanov says almost nothing. Ivan Ivanov, about 1860, Pinsk district, Minsk Governorate already says which fond to open.
Name one line in the application
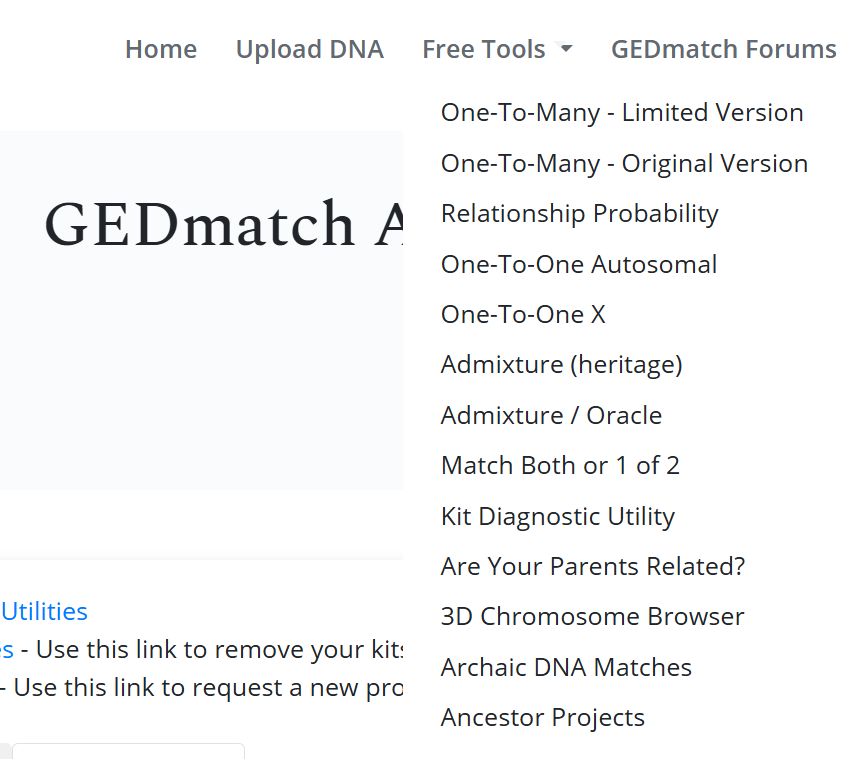
The path on the site: Home → Free Tools → Ancestor Projects. Open the Search Projects tab and type Belarus in the Search field. In the project row, press the green JOIN button.
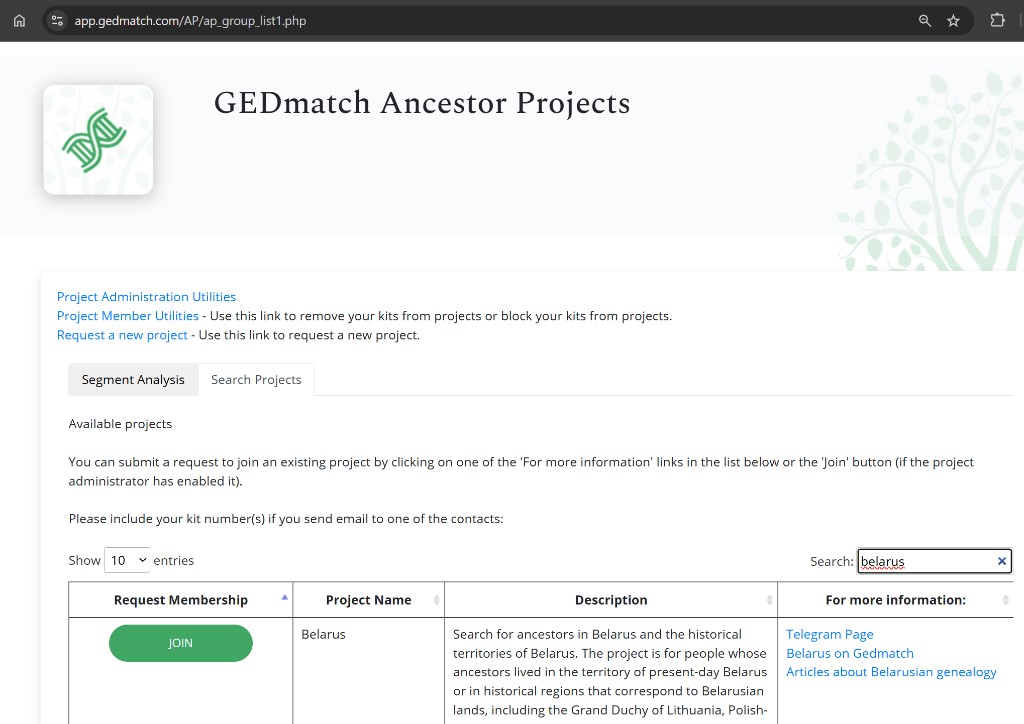
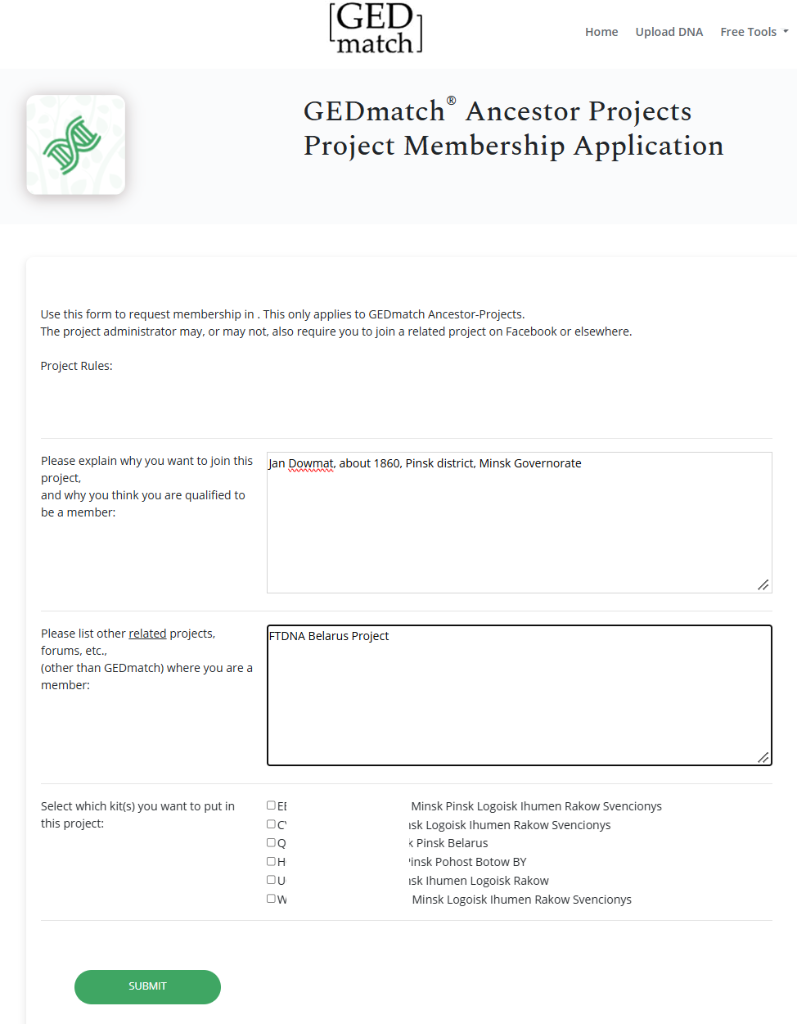
Fill the form with your own data in English or Latin script, as in fig. 3: in the first field, the ancestor, an approximate date and the place of this line, not the whole tree; in the second, other projects and forums if you belong to them; below, tick the kit of this line. Cyrillic reaches the administrator as question marks.
Father's line.

Ivan Ivanov, born around 1860,
Such-and-such village, Such-and-such parish,
Pinsk district, Minsk Governorate.

Surnames on this line:
Ivanov, Petrov, Petrashkevich / Pietraszkiewicz.

This GEDmatch kit belongs to me.
My father has not been DNA tested.
Kit: AB1234567
If the region in the project is paternal and your father has also tested, join with his number and say so. Your kit is half another side.
The word Belarus in an application gives little. The borders of that region in the documents are different: the Grand Duchy of Lithuania, the Polish-Lithuanian Commonwealth, the Russian Empire, interwar Poland, the BSSR. The administrator needs a place and a surname in order to put your kit on a specific branch. That is the point of the project: shared segments inside a geographic group, and then surnames, villages and the archive. Not one more general list of the whole site.
If you want to go further
This page is only the path to the application. How the upload, the profile, the tree, the text for other projects and the reading of segments are set up is in four articles: the file, profile and tree, the application, matches and the letter. Where to start, and how to check that the setup is finished: the overview.